Developer Guide
Introducing MediConnect - the hospital management application designed to streamline patient management,
doctor coordination, and hospital billing. As a centralised platform, MediConnect offers healthcare
professionals and administrative staff an efficient solution to manage administrative matters in local clinics.
The app simplifies the organization and maintenance of patient and doctor data, appointments and billing records.
MediConnect can be used with either a command line interface (CLI) or a graphical user interface (GUI).
- Acknowledgements
- Setting up, getting started
- Design
- Implementation
- Prescribe Feature
- Documentation, logging, testing, configuration, dev-ops
- Appendix: Requirements
- Appendix: Instructions for manual testing
- Appendix: Planned Enhancements
Acknowledgements
- Based on the AddressBook-Level3 project created by the SE-EDU initiative.
- Libraries used:
Setting up, getting started
Refer to the guide Setting up and getting started.
Design
.puml files used to create diagrams in this document can be found in the diagrams folder. Refer to the PlantUML Tutorial at se-edu/guides to learn how to create and edit diagrams.
Architecture
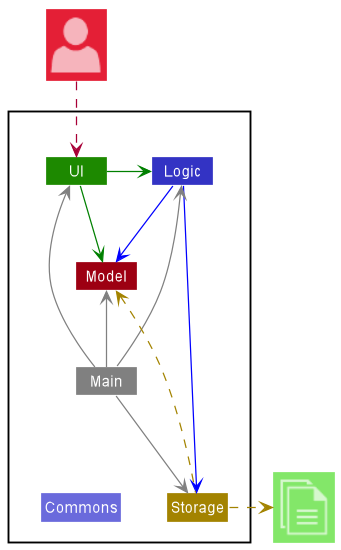
The Architecture Diagram given above explains the high-level design of the App.
Given below is a quick overview of main components and how they interact with each other.
Main components of the architecture
Main has two classes called Main and MainApp. It is responsible for,
- At app launch: Initializes the components in the correct sequence, and connects them up with each other.
- At shut down: Shuts down the components and invokes cleanup methods where necessary.
Commons represents a collection of classes used by multiple other components.
The rest of the App consists of four components.
-
UI: The UI of the App. -
Logic: The command executor. -
Model: Holds the data of the App in memory. -
Storage: Reads data from, and writes data to, the hard disk.
How the architecture components interact with each other
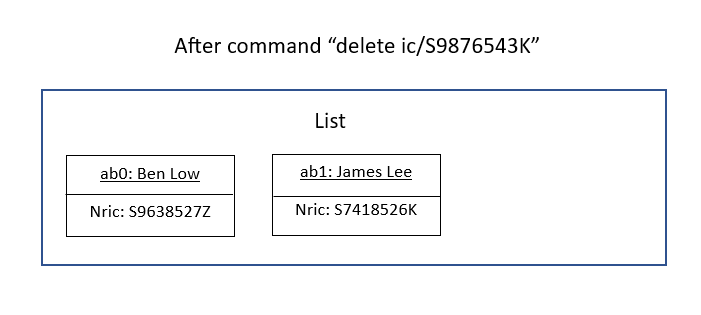
The Sequence Diagram below shows how the components interact with each other for the scenario where the user issues the command delete ic/S9876543K.
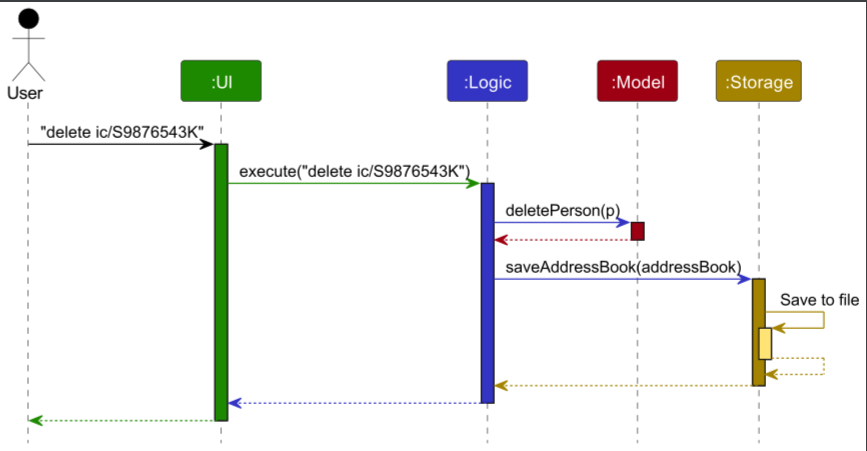
Each of the four main components (also shown in the diagram above),
- defines its API in an
interfacewith the same name as the Component. - implements its functionality using a concrete
{Component Name}Managerclass (which follows the corresponding APIinterfacementioned in the previous point.
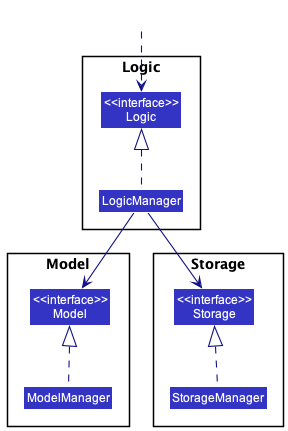
For example, the Logic component defines its API in the Logic.java interface and implements its functionality using the LogicManager.java class which follows the Logic interface. Other components interact with a given component through its interface rather than the concrete class (reason: to prevent outside component’s being coupled to the implementation of a component), as illustrated in the (partial) class diagram below.
The sections below give more details of each component.
UI component
The API of this component is specified in Ui.java
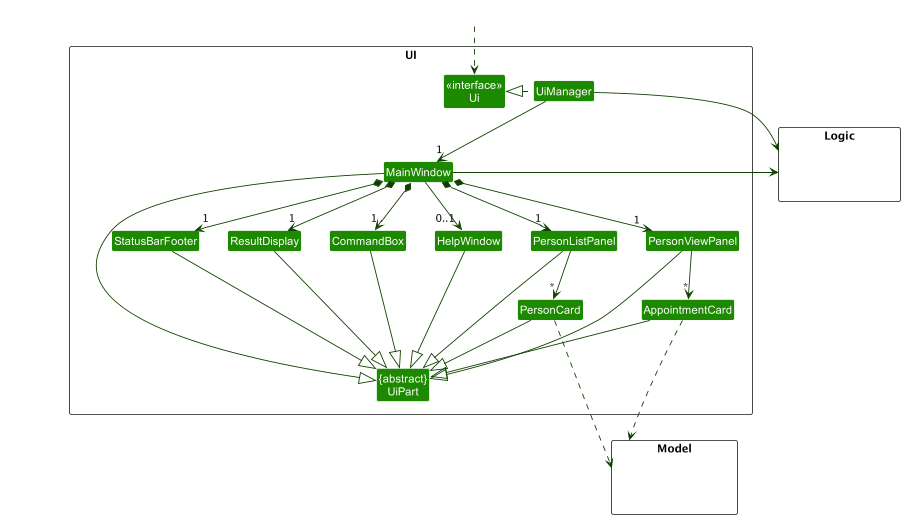
The UI consists of a MainWindow that is made up of parts e.g.CommandBox, ResultDisplay, PersonListPanel, StatusBarFooter etc. All these, including the MainWindow, inherit from the abstract UiPart class which captures the commonalities between classes that represent parts of the visible GUI.
The UI component uses the JavaFx UI framework. The layout of these UI parts are defined in matching .fxml files that are in the src/main/resources/view folder. For example, the layout of the MainWindow is specified in MainWindow.fxml
The UI component,
- executes user commands using the
Logiccomponent. - listens for changes to
Modeldata so that the UI can be updated with the modified data. - keeps a reference to the
Logiccomponent, because theUIrelies on theLogicto execute commands. - depends on some classes in the
Modelcomponent, as it displaysPersonobject residing in theModel.
Logic component
API : Logic.java
Here’s a (partial) class diagram of the Logic component:
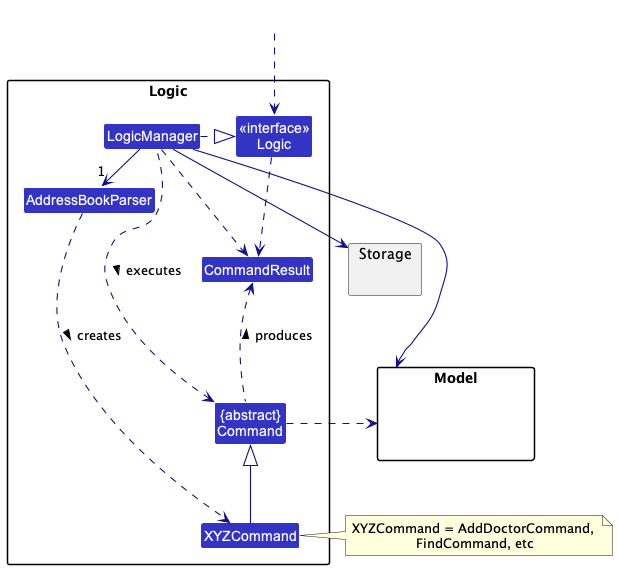
How the Logic component works:
- When
Logicis called upon to execute a command, it uses theAddressBookParserclass to parse the user command. - This results in a
Commandobject (more precisely, an object of one of its subclasses e.g.,AddDoctorCommand) which is executed by theLogicManager. - The command can communicate with the
Modelwhen it is executed (e.g. to add a doctor). - The result of the command execution is encapsulated as a
CommandResultobject which is returned back fromLogic.
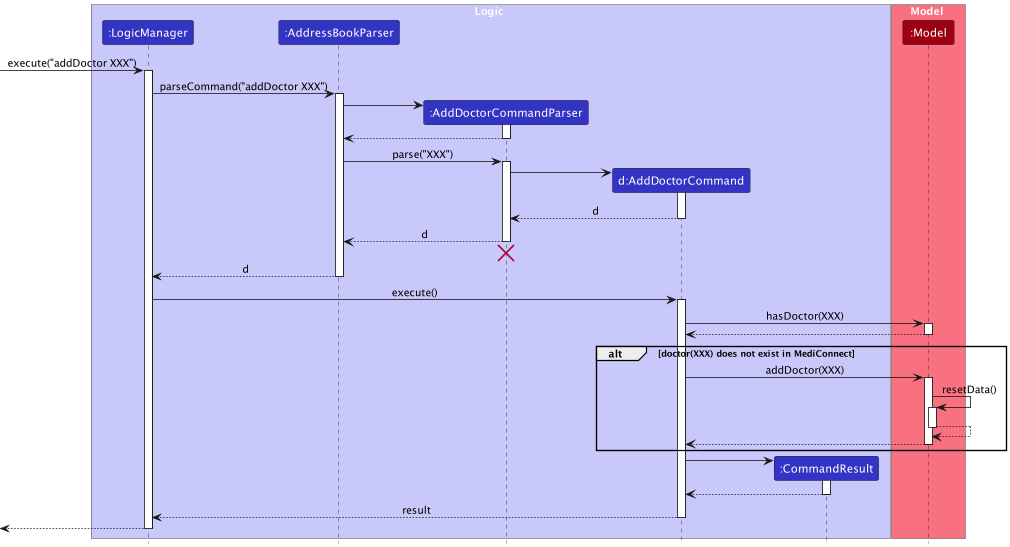
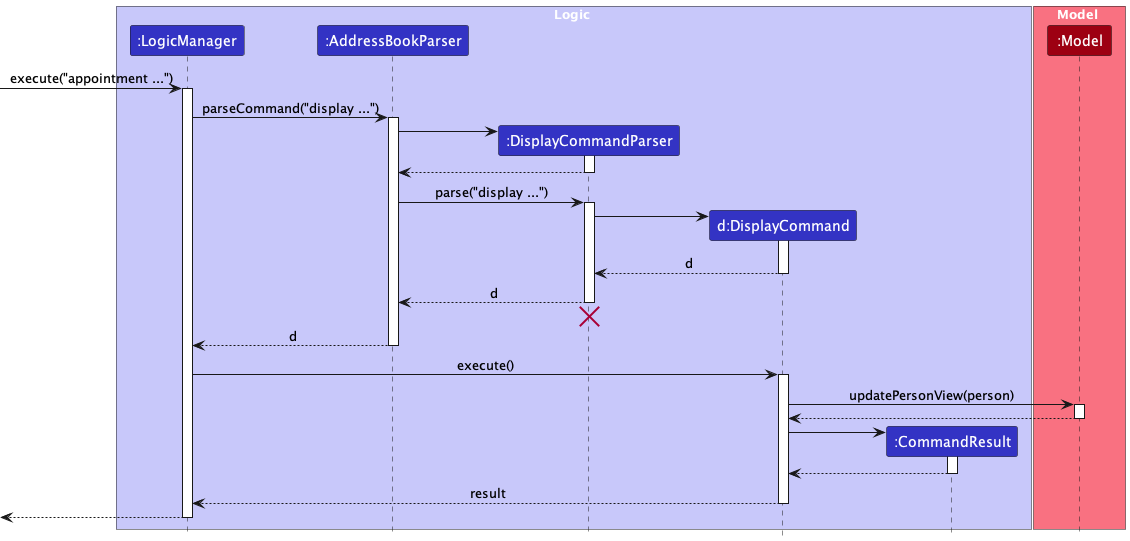
The Sequence Diagram below illustrates the interactions within the Logic component for the execute("delete ic/S9876543K") API call.
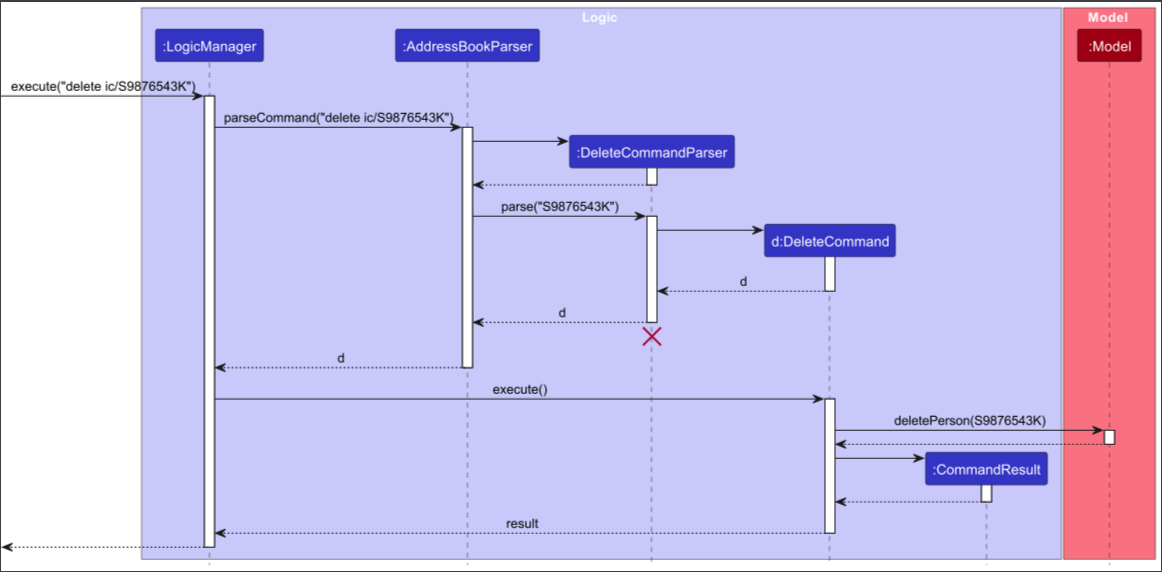
DeleteCommandParser should end at the destroy marker (X) but due to a limitation of PlantUML, the lifeline reaches the end of diagram.
Here are the other classes in Logic (omitted from the class diagram above) that are used for parsing a user command:
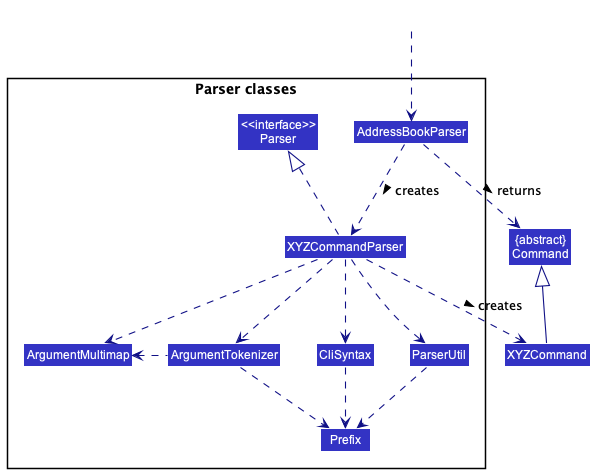
How the parsing works:
- When called upon to parse a user command, the
AddressBookParserclass creates anXYZCommandParser(XYZis a placeholder for the specific command name e.g.,AddDoctorCommandParser) which uses the other classes shown above to parse the user command and create aXYZCommandobject (e.g.,AddDoctorCommand) which theAddressBookParserreturns back as aCommandobject. - All
XYZCommandParserclasses (e.g.,AddDoctorCommandParser,DeleteCommandParser, …) inherit from theParserinterface so that they can be treated similarly where possible e.g, during testing.
Model component
API : Model.java

The Model component,
- stores the address book data i.e., all
Personobjects (which are contained in aUniquePersonListobject). - stores the currently ‘selected’
Personobjects (e.g., results of a search query) as a separate filtered list which is exposed to outsiders as an unmodifiableObservableList<Person>that can be ‘observed’ e.g. the UI can be bound to this list so that the UI automatically updates when the data in the list change. - stores a
UserPrefobject that represents the user’s preferences. This is exposed to the outside as aReadOnlyUserPrefobjects. - does not depend on any of the other three components (as the
Modelrepresents data entities of the domain, they should make sense on their own without depending on other components)
Tag list in the AddressBook, which Person references. This allows AddressBook to only require one Tag object per unique tag, instead of each Person needing their own Tag objects.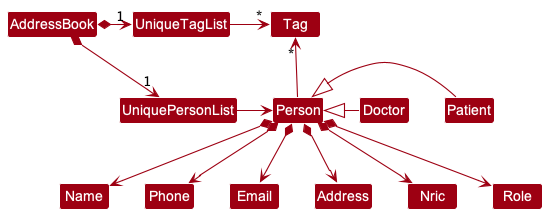
Person
- The
Personobject under theModelcomponent, stores information of a generic person - A
Personobject extends aPatientor aDoctor, which stores information specific to a patient and a doctor respectively - Note that only the
Nricuniquely identifies eachPerson
Appointment
- The
Appointmentobject is stored within theAppointmentpackage, under theModelcomponent. - Stores the required information of an appointment, including patient’s
Nric,Booking, and doctor’sNric- Note that the patient’s
Nricand doctor’sNrichas to exist inMediConnect
- Note that the patient’s
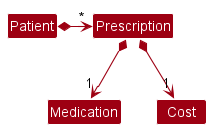
Prescription
- The
Prescriptionobject is stored within thePrescriptionpackage, under theModelcomponent. - Stores the required information of a prescription, including
Cost, andMedication- Note that
Prescriptioncan only be created for an existingPatientinMediConnect
- Note that
Storage component
API : Storage.java
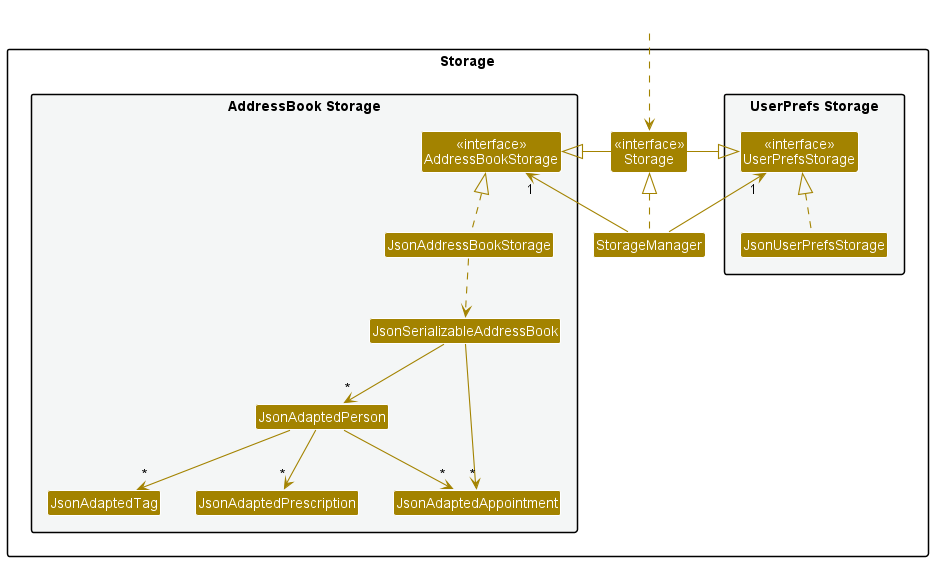
The Storage component,
- can save both address book data and user preference data in json format, and read them back into corresponding objects.
- inherits from both
AddressBookStorageandUserPrefStorage, which means it can be treated as either one (if only the functionality of only one is needed). - depends on some classes in the
Modelcomponent (because theStoragecomponent’s job is to save/retrieve objects that belong to theModel)
Common classes
Classes used by multiple components are in the seedu.addressbook.commons package.
Implementation
This section describes some noteworthy details on how certain features are implemented.
Adding a Person
The add mechanism is facilitated by MediConnect.
It allows the user to add new a person (Patient/Doctor) to the list using addPatient or addDoctor
Given below is an example usage scenario and how the add mechanism behaves at each step.
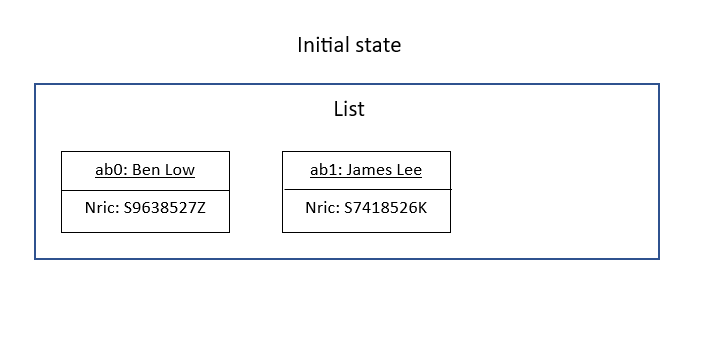
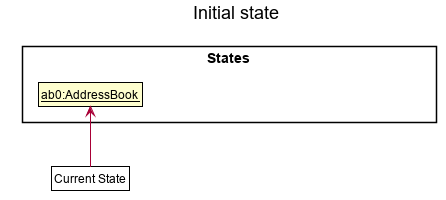
Step 1. The user launches the application. The MediConnect will be initialized with the initial address book state, and the currentStatePointer pointing to that single address book state.
All existing patients and doctors are shown as an indexed list.
Step 2. The user inputs the appropriate command (either addPatient or addDoctor), followed by the required input fields as shown below:
addDoctor n/Sarah Tan p/99123456 e/sarah@abc.com ic/T7654321P a/Sarah Rd t/Pediatrician
Step 3. The addDoctorCommandParser checks whether all the required fields are present and correct. If all fields are correct it creates a new addDoctorCommand.
Step 4. The addDoctorCommand checks if the person does not already exist in the list.
Step 5. The addDoctorCommand calls Model#addDoctor(), which adds the doctor to the UniquePersonList in ModelManager.
Step 6. MediConnect will store the updated list in Storage and display the new doctor in the Ui.
The following sequence diagram shows how the addDoctor mechanism works:
Design Considerations
Aspects
Command Format:
- Option 1 (Current Choice): Have separate commands for adding patients and doctors.
- Pros: Easier implementation, Clearly defined use
- Cons: Increasing number of commands might lead to confusion
- Option 2: Have one
addCommandand let the user specify the person’s role.- Pros: Easy to remember
- Cons: Harder to implement, The command would be too long
Deleting a Person
The delete mechanism is facilitated by MediConnect. It extends MediConnect with a delete function.
Given below is an example usage scenario and how the delete mechanism behaves at each step.
Step 1. The user launches the application for the first time. The MediConnect will be initialized with the initial list state, with a sample list of names.
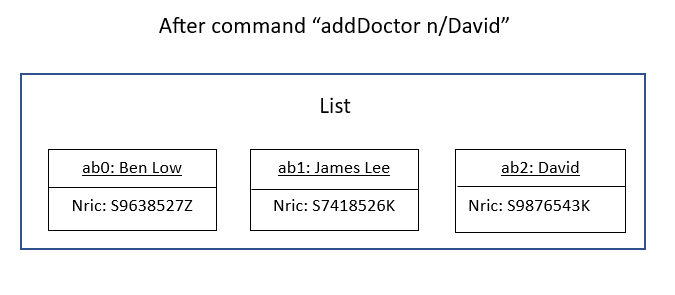
Step 2. The user executes addDoctor n/David … to add a new doctor. The NRIC of the doctor is also included.
Step 3. The user now wants to delete the person, and decides to carry out the delete operation by executing the delete command.
Step 4. The user executes delete ic/S9876543K command to delete the person with the NRIC S9876543K in the MediConnect. The delete command removes the person with the corresponding NRIC from the current list.
Design considerations:
Aspect: How delete executes:
-
Current choice: Delete the patient/doctor with the given NRIC
- Pros: Easy to implement. No need to worry about multiple people with same name, since everyone has a unique nric number.
- Cons: Cannot delete multiple people at once. User might delete the wrong nric accidentally since it is a long chain of numbers.
Display feature
The display feature is to allow the user to view all detailed particulars of a Patient or Doctor. Note that the Person has to exist in MediConnect. This feature is intended to complement the Edit, Appointment and Prescription features, allowing users to access all of the Person’s information when updating records.
Given below is an example usage scenario and how the display mechanism behaves at each step.
Scenario: Mary Smith is a patient (already registered in the system) who has just arrived at the clinic for her appointment. She is required to register her visit before consulting the doctor.
Step 1. The healthcare administrative staff wishes to verify that Mary has an appointment scheduled at this time. The staff first verifies Mary Smith’s Nric with her, and executes display ic/S1234567X. As seen from Mary’s appointment list, an appointment is indeed scheduled for today, and the staff proceeds to register her visit.
The sequence diagram below shows how the DisplayCommand works:
- When the user inputs
display ic/[NRIC], theLogicManagercallsAddressBookParserto parse the command. This creates anAppointmentCommandParserto parse the person’sNricthroughParserUtil- Any invalid inputs will throw a
ParseException
- Any invalid inputs will throw a
- Otherwise, it creates an
DisplayCommand. TheLogicManagerthen executes theDisplayCommand, upon which thePersonis retrieved byNricbefore callingModel#updatePersonView()to display the detailed view of the retrievedPerson-
CommandExceptionis thrown- if
PatientorDoctorretrieved byNricdoes not exist
- if
-
Appointment feature
Appointment represents a scheduled meeting between a Patient and a Doctor. When a Patient is scheduled an appointment with a Doctor, that corresponding Doctor will have an appointment scheduled with that particular Patient. Each Appointment consists of the following:
- Patient’s
Nricof thePatientscheduled for an appointment -
Bookingconsisting the date of the appointment - Doctor’s
Nricof theDoctorthat thePatientis scheduled with in the appointment
Adding an appointment
Given below is an example usage scenario and how the add appointment mechanism behaves at each step.
Scenario: Mary Smith is an outpatient (already registered in the system) due for her medical check-up with Dr. Paul West (already registered in the system) in 2 weeks, on 01-02-2023 10:00. (Note: This scenario assumes that there is currently no existing appointment data that has been created or stored in MediConnect.)
Step 1. The healthcare administrative staff first verifies Mary Smith’s Nric with her, and executes appointment ic/S1234567X d/01-02-2023 10:00 dric/S7654321R command to add an appointment for Mary Smith at the specified date, with Dr Paul West. This adds an Appointment to Mary, anAppointment to Dr. Paul, and an Appointment to the HospitalAppointmentList. The successful execution of the command confirms that both Mary Smith does not have any prior booking on this date and that Dr. Paul West is not scheduled to meet any other patients on the same date.
The sequence diagram below shows how the AppointmentCommand works:
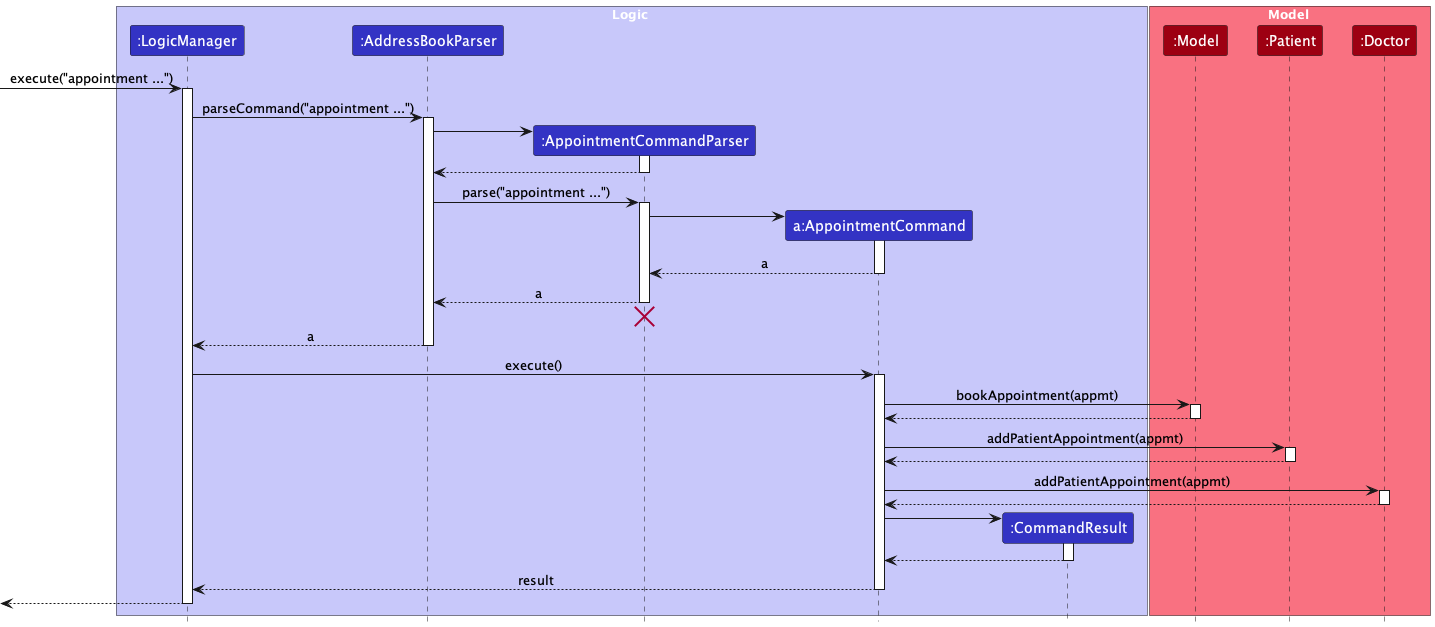
- When the user inputs
appointment ic/[NRIC] d/[DATE] dric/[NRIC], theLogicManagercallsAddressBookParserto parse the command. This creates anAppointmentCommandParserto parse the patient’sNric,Booking, and doctor’sNricinputs throughParserUtil- Any invalid inputs will throw a
ParseException
- Any invalid inputs will throw a
- Otherwise, it creates an
AppointmentCommandwith the newAppointmentcreated. TheLogicManagerthen executes theAppointmentCommand, upon which theAppointmentis added to thePatientandDoctor’s appointment list, as well as theModelby callingModelManager#bookAppointment().-
CommandExceptionis thrown- if
PatientorDoctorretrieved byNricdoes not exist, or - if
Appointmentalready exists inModel
- if
-
- Since the
PatientandDoctor’sAppointmentattributes have been updated, new instances ofPatientandDoctorare created, and saved withModel#setPerson()
Deleting an appointment
The sequence diagram below shows how the DeleteAppointmentCommand is parsed:
{add a sequence diagram}
Given below is an example usage scenario and how the delete appointment mechanism behaves at each step.
Scenario: Mary Smith already has a medical check-up scheduled with Dr. Paul West (already registered in the system) on 01-02-2023 10:00. However, she realizes that she cannot make it and wishes to cancel the appointment. (Note: This scenario assumes that there is currently no existing appointment data that has been created or stored in MediConnect.)
Step 1. The healthcare administrative staff first verifies Mary Smith’s Nric with her, and executes display ic/S1234567X to view all her existing appointment bookings. This displays Mary’s list of appointments, and the appointment that needs to be cancelled is located at index 1.
Step 2. The user executes deleteAppointment 1 ic/S1234567X command to delete the appointment at index 1 of Mary’s list of appointments. This removes the Appointment from Mary’s and Dr. Paul’s appointment list, and from HospitalAppointmentList.
The sequence diagram below shows how the DeleteAppointmentCommand works:
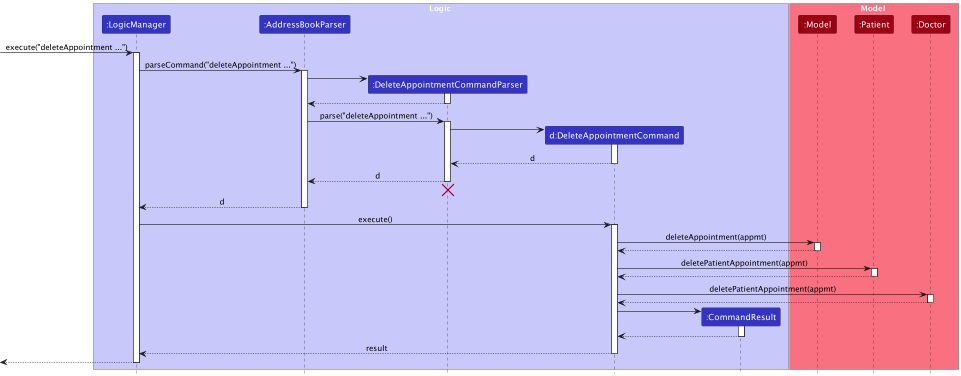
- When the user inputs
deleteAppointment INDEX ic/[NRIC], theLogicManagercallsAddressBookParserto parse the command. This creates aDeleteAppointmentCommandParserto parse the patient’sNric, andINDEXthroughParserUtil- Any invalid inputs will throw a
ParseException
- Any invalid inputs will throw a
- Otherwise, it creates a
DeleteAppointmentCommand. TheLogicManagerthen executes theDeleteAppointmentCommand, upon which theAppointmentto be deleted is retrieved and removed from thePatientandDoctor’s appointment list, as well as theModelby callingModelManager#deleteAppointment().-
CommandExceptionis thrown- if
PatientorDoctorretrieved byNricdoes not exist, or - if
INDEXis invalid
- if
-
- Since the
PatientandDoctor’sAppointmentattributes have been updated, new instances ofPatientandDoctorare created, and saved withModel#setPerson()
Design considerations:
-
Aspect: Command format:
-
Alternative 1 (current choice): Delete appointment specified by the
INDEX.- Pros: User can input a shorter command.
- Cons: Can be tedious to find the appointment to delete if the appointment list gets very long.
-
Alternative 2: Delete appointment specified by the
Bookingand doctor’sNric.- Pros: User does not have to search through the patient’s appointment list to identify which appointment to delete.
- Cons: More tedious to implement and less convenient for the user to input command.
Prescribe Feature
Prescription refers to a Medication being sold at a Cost. Each Patient can have one or more Prescriptions
which can help generate their bill. There are a few ways to implement connecting these 4 classes, and we opted for
the one simplest for the User to use as our Users could be not tech-savvy.
Design considerations:
-
Alternative 1 (Current Choice): Allow
Patientto have direct access toPrescription, which encapsulatesMedicationandCost.- Pros: Simpler to implement as it reuses existing code.
- Cons: Duplicated information, if multiple
Patienthave the samePrescription.
-
Alternative 2: Allow
Patientto have access to onlyMedication. And store thePrescriptionrelationship ofMedicationandCostin a separate table.- Pros: This is the most object-oriented, and thus intuitive design.
Patientis less coupled toCost. - Cons: Most challenging design. Does not allow prescribing
Medicationat a differentCost, such as if the prices rise.
- Pros: This is the most object-oriented, and thus intuitive design.

[Proposed] Undo/redo feature
Proposed Implementation
The proposed undo/redo mechanism is facilitated by VersionedAddressBook. It extends AddressBook with an undo/redo history, stored internally as an addressBookStateList and currentStatePointer. Additionally, it implements the following operations:
-
VersionedAddressBook#commit()— Saves the current address book state in its history. -
VersionedAddressBook#undo()— Restores the previous address book state from its history. -
VersionedAddressBook#redo()— Restores a previously undone address book state from its history.
These operations are exposed in the Model interface as Model#commitAddressBook(), Model#undoAddressBook() and Model#redoAddressBook() respectively.
Given below is an example usage scenario and how the undo/redo mechanism behaves at each step.
Step 1. The user launches the application for the first time. The VersionedAddressBook will be initialized with the initial address book state, and the currentStatePointer pointing to that single address book state.
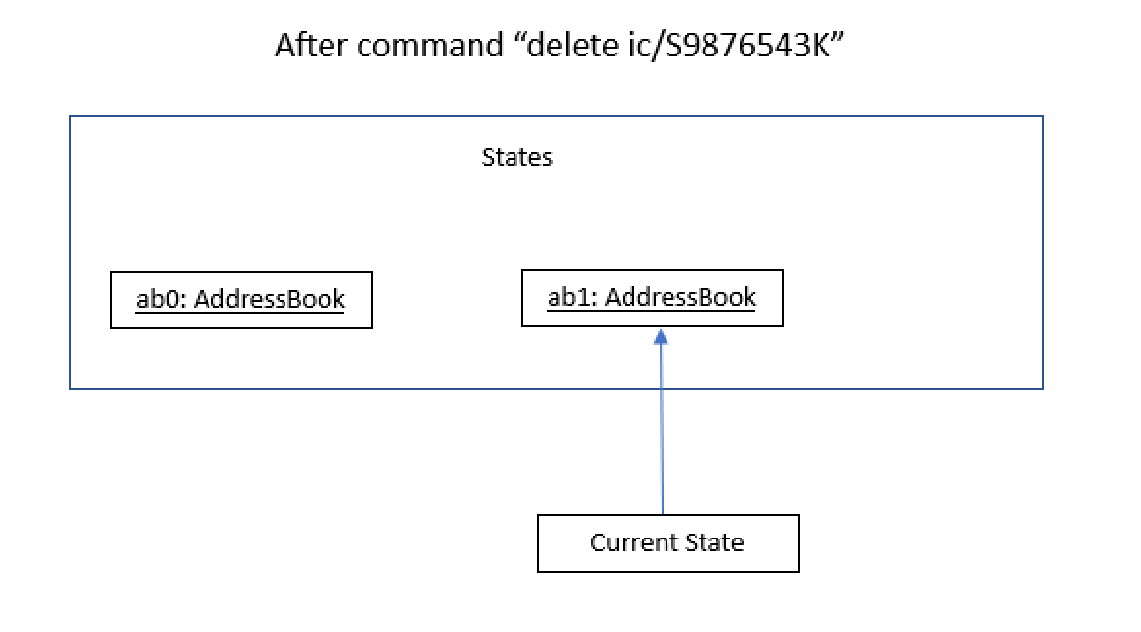
Step 2. The user executes delete ic/S9876543K command to delete the person with the NRIC S9876543K in the address book. The delete command calls Model#commitAddressBook(), causing the modified state of the address book after the delete ic/S9876543K command executes to be saved in the addressBookStateList, and the currentStatePointer is shifted to the newly inserted address book state.
Step 3. The user executes add n/David … to add a new person. The add command also calls Model#commitAddressBook(), causing another modified address book state to be saved into the addressBookStateList.

Model#commitAddressBook(), so the address book state will not be saved into the addressBookStateList.
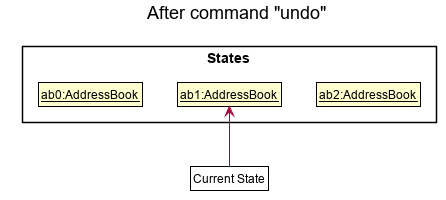
Step 4. The user now decides that adding the person was a mistake, and decides to undo that action by executing the undo command. The undo command will call Model#undoAddressBook(), which will shift the currentStatePointer once to the left, pointing it to the previous address book state, and restores the address book to that state.
currentStatePointer is at index 0, pointing to the initial AddressBook state, then there are no previous AddressBook states to restore. The undo command uses Model#canUndoAddressBook() to check if this is the case. If so, it will return an error to the user rather
than attempting to perform the undo.
The following sequence diagram shows how the undo operation works:
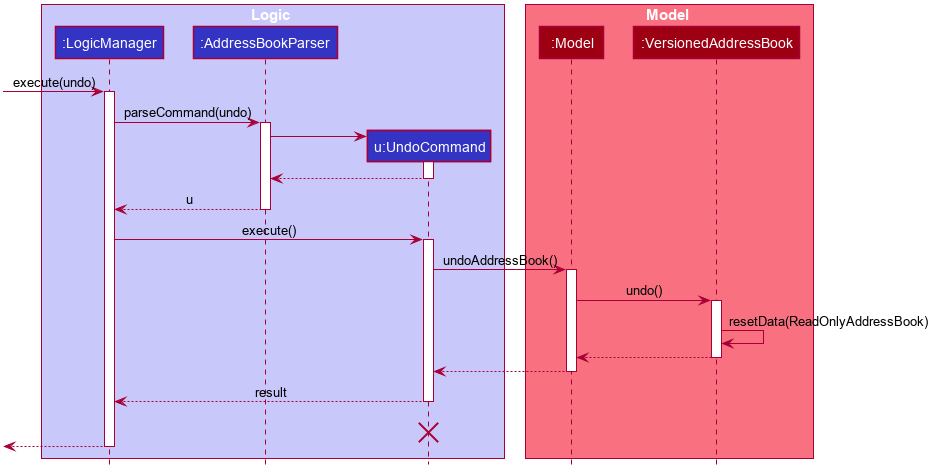
UndoCommand should end at the destroy marker (X) but due to a limitation of PlantUML, the lifeline reaches the end of diagram.
The redo command does the opposite — it calls Model#redoAddressBook(), which shifts the currentStatePointer once to the right, pointing to the previously undone state, and restores the address book to that state.
currentStatePointer is at index addressBookStateList.size() - 1, pointing to the latest address book state, then there are no undone AddressBook states to restore. The redo command uses Model#canRedoAddressBook() to check if this is the case. If so, it will return an error to the user rather than attempting to perform the redo.
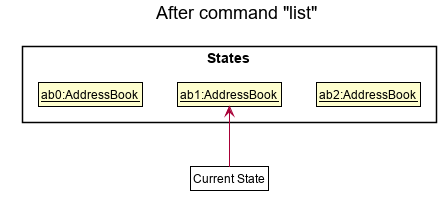
Step 5. The user then decides to execute the command list. Commands that do not modify the address book, such as list, will usually not call Model#commitAddressBook(), Model#undoAddressBook() or Model#redoAddressBook(). Thus, the addressBookStateList remains unchanged.
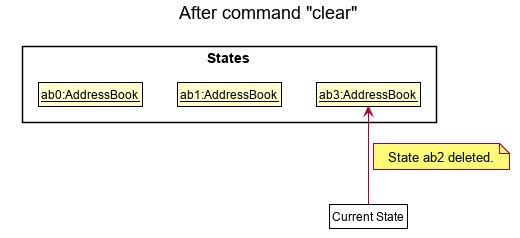
Step 6. The user executes clear, which calls Model#commitAddressBook(). Since the currentStatePointer is not pointing at the end of the addressBookStateList, all address book states after the currentStatePointer will be purged. Reason: It no longer makes sense to redo the add n/David … command. This is the behavior that most modern desktop applications follow.
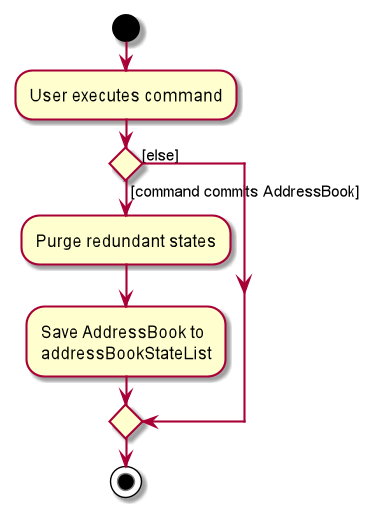
The following activity diagram summarizes what happens when a user executes a new command:
Design considerations:
Aspect: How undo & redo executes:
-
Alternative 1 (current choice): Saves the entire address book.
- Pros: Easy to implement.
- Cons: May have performance issues in terms of memory usage.
-
Alternative 2: Individual command knows how to undo/redo by
itself.
- Pros: Will use less memory (e.g. for
delete, just save the person being deleted). - Cons: We must ensure that the implementation of each individual command are correct.
- Pros: Will use less memory (e.g. for
Documentation, logging, testing, configuration, dev-ops
Appendix: Requirements
Product scope
Target user profile:
- Hospital administrative staff, Doctors
- A person that:
- needs to manage a significant number of patient/doctor data
- prefers desktop apps over other types
- can type fast
- prefers typing to mouse interactions
- is reasonably comfortable using CLI apps
Value proposition: manage patient/doctor details faster than a typical mouse/GUI driven app
User stories
Priorities: High (must have) - * * *, Medium (nice to have) - * *, Low (unlikely to have) - *
| Priority | As a … | I want to … | So that … |
|---|---|---|---|
* * * |
healthcare provider | access a dashboard to keep track of my patients’ information, medical history, and appointment schedules | I can provide better care. |
* * * |
healthcare provider | update patient information and medical history after each appointment | I have a complete and accurate record of the patient’s health. |
* * * |
healthcare provider | access a directory of specialist doctors and referral information | I can quickly and easily connect my patients with the right care. |
* * * |
healthcare administrator | access patients’ records on the go/at home any time when it’s necessary to provide admin support anytime. | |
* * * |
healthcare administrator | quickly retrieve patient’s bill through the application | I can send invoices to the patients more efficiently. |
* * * |
healthcare administrator | schedule and reschedule appointments through the application | I can accomodate to the patients and doctors availability. |
* * |
tech illiterate healthcare administrator | navigate through the app easily without help. | |
* * |
healthcare administrator | create an account | I can login and handle patient’s and doctor’s information. |
* * |
healthcare administrator | access patient’s test results and medical records through the application | I can provide doctors with the patient’s health history. |
* * |
healthcare provider | access and view patient insurance information and make necessary updates | I can accurately bill patients and manage healthcare costs. |
* * |
healthcare provider | send appointment confirmations and reminders to patients | they can arrive prepared for their appointments. |
* * |
healthcare provider | access and update my own schedule and availability through the application | I can manage my workload and provide better care for my patients. |
* |
healthcare administrator | access analytics and metrics on patient engagement, appointment booking, and resource utilization | I can make data-driven decisions to improve the hospital’s operations. |
* |
healthcare administrator | manage the hospital staff and workload better using the app | there are sufficient people during each shift. |
* |
healthcare administrator | provide feedback and rate my experience with the application | I can improve the application to better suit my needs. |
* |
healthcare provider | view bed availability in real-time | I can make informed decisions about patient admission and discharge. |
* |
healthcare provider | generate and send prescription orders to the pharmacy directly from the application | I can streamline the process for my patients. |
* |
healthcare provider | view and manage patient waiting times | I can minimize wait times and improve patient satisfaction. |
* |
healthcare provider | provide virtual consultations and appointments through the application | I can reach more patients and provide better access to care. |
* |
healthcare provider | view and manage patient waitlists and triage patient needs | I can prioritize the most urgent cases and provide better access to care. |
Use cases
(For all use cases below, the System is MediConnect (MC), unless specified otherwise)
Use case: UC01 - Add patient’s information
Actor: Healthcare administrator
MSS
- User chooses to add patient’s information.
- MC requests for details of the information.
- User enters the requested details.
-
MC displays the new patient information.
Use case ends.
Extensions
-
3a. MC detects an error in the entered data.
-
3a1. MC requests for the correct data.
-
3a2. User enters new data.
Steps 3a1-3a2 are repeated until the data entered are correct.
Use case resumes from step 4.
-
-
3b. MC detects that the patient already exists in the list.
-
3b1. MC informs user that the patient already exists.
-
3b2. User enters new data.
Steps 3b1-3b2 are repeated until the data entered are correct.
Use case resumes from step 4.
-
Use case: UC02 - Add doctor’s information
Actor: Healthcare administrator
MSS
- User chooses to add doctor’s information.
- MC requests for details of the information.
- User enters the requested details.
-
MC displays the new doctor’s information.
Use case ends.
Extensions
-
3a. MC detects an error in the entered data.
-
3a1. MC requests for the correct data.
-
3a2. User enters new data.
Steps 3a1-3a2 are repeated until the data entered are correct.
Use case resumes from step 4.
-
-
3b. MC detects that the doctor already exists in the list.
-
3b1. MC informs user that the doctor already exists.
-
3b2. User enters new data.
Steps 3b1-3b2 are repeated until the data entered are correct.
Use case resumes from step 4.
-
Use case: UC03 - Retrieve patient’s information
Actor: Doctor
MSS
- User chooses to retrieve patient’s information.
- MC retrieves the patient’s information
-
MC displays the patient information that was retrieved.
Use case ends.
Extensions
-
3a. MC detects an error in the entered data.
-
3a1. MC requests for the correct data.
-
3a2. User enters new data.
Steps 3a1-3a2 are repeated until the data entered are correct.
Use case resumes from step 4.
-
-
3b. User request an unassigned patient’s information
-
3b1. MC denies the request.
Use case ends.
-
Use case: UC04 - Delete patient’s information
Actor: Hospital administration
MSS
- User choose to delete patient information.
- MC request for the patient’s NRIC number.
- User enters the requested details
-
MC displays the confirmation of the deleted patient..
Use case ends.
Extensions
-
3a. MC cannot find the patient’s NRIC in the list
-
3a1. MC informs the user that the patient cannot be found
-
3a2. User enters the corrected NRIC.
Steps 3a1-3a2 are repeated until the data entered are correct.
Use case resumes from step 4.
-
-
3b. User does not enter the
ic/field after thedeletecommand.-
3b1. MC informs the user that it is an invalid command format.
-
3b2. User enters the correct command format.
Steps 3b1-3b2 are repeated until the data entered are correct.
Use case resumes from step 4.
-
-
3c. User does not enter a NRIC number or enters an invalid NRIC format number after the
ic/field.-
3c1. MC informs the user that NRIC must follow a specific format.
-
User enters the correct NRIC format number.
Steps 3c1-3c2 are repeated until the data entered are correct.
Use case resumes from step 4.
-
Use case: UC05 - List all patients
Actor: Hospital administrator
MSS
- User chooses to retrieve a list of all patients.
- MC retrieves the list of all patients.
-
MC displays the list of patients’ names and NRIC numbers that was retrieved.
Use case ends.
Use case: UC06 - List all doctors
Actor: Hospital administrator
MSS
- User chooses to retrieve a list of all doctors.
- MC retrieves the list of all doctors.
-
MC displays the list of doctors’ names and NRIC numbers that was retrieved.
Use case ends.
Use case: UC07 - Book patient’s appointment
Actor: Healthcare administrator
MSS
- User chooses to book patient’s appointment.
- MC requests for details of the information.
- User enters the requested details.
-
MC displays the updated appointment information for the patient and the doctor.
Use case ends.
Extensions
-
3a. MC detects that the patient already has an appointment scheduled for that appointment slot.
-
3a1. MC informs the user that the appointment has been booked
-
3a2. User enters another appointment slot.
Steps 3a1-3a2 are repeated until the data entered are correct.
Use case resumes from step 4.
-
-
3b. MC detects that the doctor has already scheduled an appointment with another patient at this particular time slot.
-
3b1. MC informs the user that the appointment has been booked
-
3b2. User enters another appointment slot.
Steps 3b1-3b2 are repeated until the data entered are correct.
Use case resumes from step 4.
-
-
3c. MC detects that the patient’s nric does not exist.
-
3c1. MC informs the user that the patient’s nric is invalid
-
3c2. User enters another patient nric
Steps 3c1-3c2 are repeated until the data entered are correct.
Use case resumes from step 4.
-
-
3d. MC detects that the doctor’s nric does not exist.
-
3d1. MC informs the user that the doctor’s nric is invalid
-
3d2. User enters another doctor nric
Steps 3d1-3d2 are repeated until the data entered are correct.
Use case resumes from step 4.
-
Use case: UC08 - Cancel patient’s appointment
Actor: Healthcare administrator
MSS
- User chooses to cancel patient’s appointment.
- MC requests for details of the information.
- User enters the requested details.
-
MC displays the updated appointment information for the patient and the doctor.
Use case ends.
Extensions
-
3a. MC detects that an invalid index is entered.
-
3a1. MC informs the user that the specified index is invalid
-
3a2. User enters another index.
Steps 3a1-3a2 are repeated until the data entered are correct.
Use case resumes from step 4.
-
-
3b. MC detects that the patient’s nric does not exist.
-
3b1. MC informs the user that the patient’s nric is invalid
-
3b2. User enters another patient nric
Steps 3b1-3b2 are repeated until the data entered are correct.
Use case resumes from step 4.
-
Use case: UC09 - Prescribing medication to a Patient
Actor: Healthcare administrator
MSS
- User wants to prescribe a patient medication.
- MC requests for relevant details required to perform the operation.
- User enters the relevant details.
- MC prescribes the patient medication.
- MC shows the User the result. Use case ends.
Extensions
-
3a. User enters the wrong information, but is a valid command accepted by MC
-
3a1. MC prescribes the incorrect patient medication.
-
3a2. MC shows the User the result.
-
3a3. User notices the wrong result.
-
3a4. User removes the wrong medication (UC10).
Use case restarts from step 3.
-
Use case: UC10 - Removing prescribed medication from Patient
Actor: Healthcare administrator
MSS
- User wants to remove a prescribed medication from a patient.
- MC requests for relevant details required to perform the operation.
- User enters the relevant details.
- MC removes the prescribed medication from a patient.
- MC shows the User the result. Use case ends.
Use case: UC11 - Calculate the bill for a Patient
Actor: Healthcare administrator
MSS
- User wants to know the bill of a Patient.
- MC requests for relevant details required to perform the operation.
- User enters the relevant details.
- MC shows the user the Bill. Use case ends.
Non-Functional Requirements
- Users cannot view information of unassigned patients
- System should be backward compatible with data produced by earlier versions of the system;
- Requires Java 11
- The system should be usable by a novice who is tech illiterate
- Any other noteworthy points: Confidential information is hidden, requires access rights
Glossary
- Mainstream OS: Windows, Linux, Unix, OS-X
- Patient: Define as a customer of the hospital and only has read-access
- Doctor: Define as staff of the hospital and only has read-access
- Administrator: Define as admin staff of the hospital and has write-access
Appendix: Instructions for manual testing
Given below are instructions to test the app manually.
Launch and shutdown
-
Initial launch
-
Download the jar file and copy into an empty folder
-
Double-click the jar file Expected: Shows the GUI with a set of sample contacts. The window size may not be optimum.
-
-
Saving window preferences
-
Resize the window to an optimum size. Move the window to a different location. Close the window.
-
Re-launch the app by double-clicking the jar file.
Expected: The most recent window size and location is retained.
-
Adding a person
- Adding a patient to the existing list.
- Test case:
addPatient n/Ben Smith p/98353535 e/ben@abc.com ic/S1234567A a/1 Ben Street, block 13, #01-01
Expected: A patient Ben Smith with NRIC number S1234567A is added to the list of patients. The details of the added patient are shown in the status message. - Test case:
addPatient n/Ben Smith p/98353535 e/ben@abc.com ic/S1234567A a/1 Ben Street, block 13, #01-01(duplicate patient)
Expected: No patient is added to the list. Error details are shown in the status message. - Test case:
addPatient n/Ben Smith p/98353535 e/ben@abc.com ic/S1234567A(missing address field)
Expected: No patient is added to the list. Error details are shown in the status message. - Test case:
addPatient n/Ben Smith p/98353535 e/ben@abc.com ic/S123 a/1 Ben Street, block 13, #01-01(Wrong NRIC format)
Expected: No patient is added to the list. Error details are shown in the status message.
- Test case:
- Adding a doctor to the existing list.
- Test case:
addDoctor n/Sarah Tan p/99123456 e/sarah@abc.com ic/T7654321P a/Sarah Rd t/Pediatrician
Expected: A doctor Sarah Tan with NRIC number T7654321P is added to the list of doctors. The details of the added doctor are shown in the status message. - Test case:
addDoctor n/Sarah Tan p/99123456 e/sarah@abc.com ic/T7654321P a/Sarah Rd t/Pediatrician(duplicate doctor)
Expected: No doctor is added to the list. Error details are shown in the status message. - Test case:
addDoctor n/Sarah Tan p/99123456 e/sarah@abc.com ic/T7654321P t/Pediatrician(missing address field)
Expected: No doctor is added to the list. Error details are shown in the status message. - Test case:
addDoctor n/Sarah Tan p/99123456 e/sarah@abc.com ic/T765 a/Sarah Rd t/Pediatrician(Wrong NRIC format)
Expected: No doctor is added to the list. Error details are shown in the status message.
- Test case:
Deleting a person
-
Deleting a person while all persons are being shown
-
Prerequisites: List all persons using the
listcommand. Multiple persons in the list. -
Test case:
delete ic/S1234567A
Expected: Contact with theNRIC S1234567Ais deleted from the list. Details of the deleted contact shown in the status message. -
Test case:
delete ic/0
Expected: No person is deleted. Error details shown in the status message. No change made to the list. -
Other incorrect delete commands to try:
delete,DELETE,delete x,...(where x is larger than the list size)
Expected: Similar to previous.
-
Prescribe, Unprescribe, Bill
- Prescribing medication to someone with existing medication
- Prerequisites: Have a patient with no existing medication as the current display. This can be achieved by adding
a patient using
addPatient. Thendisplay. We will assume the Patient has an IC of S1234567A. - Test case:
prescribe ic/S1234567A m/drugA c/1
Expected: Patient has gained 1 prescription. - Test case:
prescribe ic/S1234567A m/drugA c/2
Expected: Patient’s 1 prescription has changed to reflect the new cost. - Test case:
prescribe ic/S1234567A m/drugA c/2
Expected: No change. - Test case:
prescribe ic/S1234567A m/drugB c/4
Expected: Patient has 2 prescriptions. - Test case:
bill ic/S1234567A.
Expected: Bill is $6.00 - Test case:
unprescribe ic/S1234567A m/drugA c/2
Expected: Patient has 1 prescription.
- Prerequisites: Have a patient with no existing medication as the current display. This can be achieved by adding
a patient using
Appendix: Planned Enhancements
Given below are the current known feature flaws and the plans the team have for them in the future versions.
- The current GUI is not resizable. We plan to add new features; either a dashboard or graph to occupy the extra white space to make it more user-friendly.
- The MediConnect currently does not accept name with symbols. We plan to implement that in the next version
- Currently, prescriptions do not indicate the doctor that prescribe the medication. We realise this is an important feature to have and plan to implement it in the next version.
- The find command currently does not update the display box after filtering the person. We plan to change this in the next version to automatically display the user information after finding the person in the next version.
- Currently, MediConnect does not set the person’s date of birth as a compulsory field. We plan to make the date of birth a compulsory field in the next version.
- Currently, MediConnect does not check for case sensitivity and reads upper case and lower case items as separate items. We plan to allow MediConnect to ignore case sensitivity in the next version. For example, if Paracetmol and paracetamol can be prescribed to the same patient.
- Currently, MediConnect does not limit the number of digits in a phone number. We plan to limit the maximum number of phone digits to 15 in the next version.
- Currently, MediConnect only take note of the patient’s current prescription but does not store a recorded history of the patient’s past prescription. We plan to have a prescription history in the next version.